


How to Wire a 24V or 36V Trolling Motor Battery Setup
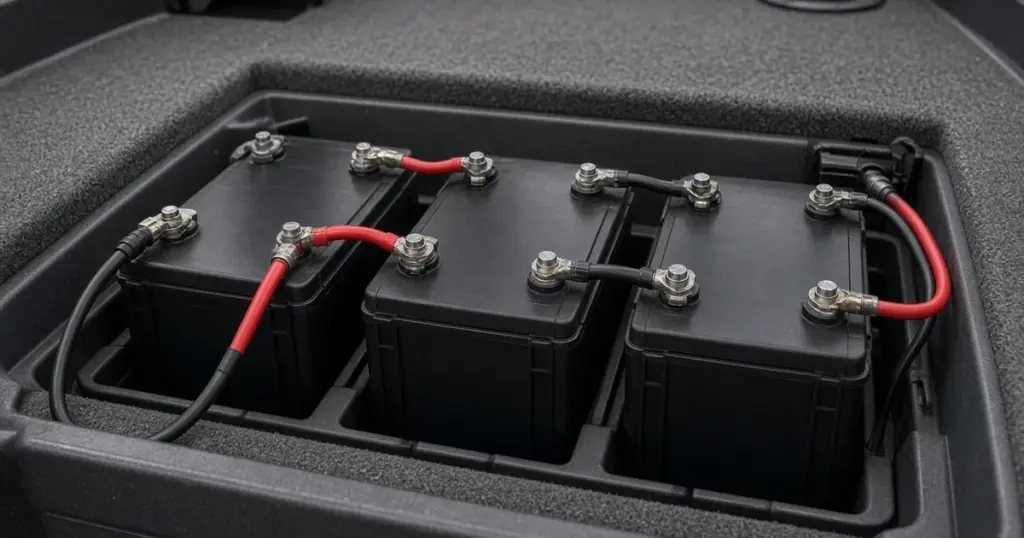
Most mid-size and high-thrust trolling motors run on 24V or 36V. Since most marine batteries are 12V, that usually means wiring two or three batteries in series. It’s a straightforward job once you understand the pattern, but getting it wrong can damage equipment or create a fire risk. Here’s how to wire a 24V or 36V trolling motor setup correctly, plus how native high-voltage lithium batteries change the picture.
Safety first: always follow your trolling motor and battery manufacturers’ instructions. They take priority over any general guide. If you’re not comfortable working with battery cables, have a qualified marine technician do the install.
Series vs parallel: the one concept you need
- Series connects the positive of one battery to the negative of the next. Voltages add, and capacity stays the same. Two 12V 100Ah batteries in series give 24V at 100Ah.
- Parallel connects positive to positive and negative to negative. Voltage stays the same, and capacity adds. Two 12V 100Ah batteries in parallel give 12V at 200Ah.
Trolling motor banks for 24V and 36V use series wiring.
What you’ll need
- Two (24V) or three (36V) identical 12V deep-cycle batteries, all the same brand, model, capacity and age. Or a single native 24V or 36V battery.
- Marine-grade battery cable sized for your motor’s current draw and the length of the run. Check the motor’s manual for its recommendation.
- Short jumper cables between batteries, in the same gauge as the main leads.
- A circuit breaker or fuse in the positive lead, as the motor manufacturer specifies.
- Correctly sized lugs, heat-shrink and terminal hardware.
- Battery trays or hold-downs.
Prefer a kit? Pre-made connection kits like the Dakota Lithium 24V connection kit with onboard charging and the Dakota Lithium 36V connection kit include matched cables and connections. More are in Accessories.
Before you start
- Turn the trolling motor off and disconnect it from the batteries.
- Disconnect any onboard charger from shore power.
- Remove jewelry, and use insulated tools. A wrench across battery terminals can cause severe burns.
- Fully charge all batteries before you connect them in series, so they start balanced.
- Label your batteries A, B and, for 36V, C.
How to wire a 24V trolling motor (two 12V batteries)
- Jumper: connect the positive (+) of battery A to the negative (−) of battery B.
- Motor negative: connect the motor’s negative lead to the negative (−) of battery A.
- Motor positive: connect the motor’s positive lead, through the breaker or fuse, to the positive (+) of battery B.
The two remaining terminals, A positive and B negative, are joined only by the jumper. Measure across the motor leads with a multimeter. You should see roughly double a single battery’s voltage.
How to wire a 36V trolling motor (three 12V batteries)
- Jumper 1: connect A positive (+) to B negative (−).
- Jumper 2: connect B positive (+) to C negative (−).
- Motor negative: to A negative (−).
- Motor positive: through the breaker or fuse, to C positive (+).
Check with a multimeter. You should read about three times a single battery’s voltage across the motor leads.
Fuses and breakers
Place the breaker or fuse in the positive lead, close to the battery. Use the rating your trolling motor manufacturer specifies. It should protect the wire. A properly sized manual-reset breaker doubles as a convenient disconnect. With lithium batteries, which can deliver very high current into a short, fusing close to the battery is especially important. See marine-rated battery fuses and fuse blocks.
Cable sizing and routing
Cable gauge depends on the motor’s current draw and the round-trip length of the run, from the batteries to the motor and back. Longer runs need heavier cable to avoid voltage drop. Your motor’s manual usually has a chart. Route cables away from sharp edges and moving parts, secure them every so often, and use heat-shrink on terminal ends to keep moisture and salt out. More on that in saltwater corrosion prevention.
Charging a series bank
The most common approach is a multi-bank onboard charger, with one bank per battery: two banks for 24V, three for 36V. Each charger bank connects to one battery’s positive and negative terminals. This keeps each battery individually charged and balanced, and you don’t need to undo the series jumpers. Kits with charging leads, like the 36V connection kit with onboard charging, make this tidy.
Some systems use a single 24V or 36V charger across the whole string. Whether that’s appropriate depends on the battery manufacturer. Many recommend per-battery charging for series lithium banks. Follow their guidance. For lithium, every charger bank must have a lithium profile. See charging lithium on a boat and our Chargers collection, including the EPOCH 4-bank 12V marine charger.
Powering 12V electronics
It’s tempting to connect a fish finder to one battery in the string. Don’t. That battery drains faster than the others, and the bank goes out of balance, which shortens battery life and can make a lithium BMS shut a battery off early. Instead:
- run electronics from a separate 12V battery, often the starting battery or a dedicated electronics battery; or
- use a DC-DC converter to step the bank down to 12V, such as the Dakota Lithium 24V/36V to 12V converter, sized for your loads.
The native-voltage alternative
A single native 24V or 36V lithium battery eliminates jumpers, multiple terminals and balance concerns. You connect the motor to two terminals and charge with one charger of the matching voltage. Options include the Battle Born 24V 50Ah, the Interstate 24V 60Ah Group 31M, the Dakota Lithium 36V 60Ah and the Lithium Rhino 36V 120Ah kit. Single-case connection systems, like the Dakota Lithium 36V single-case connection system, finish the install.
Native batteries need one compartment big enough for the case, while series sets can spread across smaller compartments. Compare both in Trolling Motor.
Final checks
- All connections tight, torqued to the manufacturer’s spec, and protected.
- Voltage across the motor leads reads as expected.
- Breaker or fuse installed, and sized per the motor manual.
- Batteries secured; cables strapped and protected from chafe.
- Charger connected per bank, with the correct profile set.
- A quick test run on the water, watching for heat at any connection.
Not sure which way to go, or want it done right the first time? Anywhere from Venice to Gainesville, FL, our local installation team wires trolling motor systems every week. For help choosing batteries, start with how to choose a trolling motor battery.